I have spent many an hour transfixed, adding in different types of headers and reformatting each text line individually so that my copy ended up how I wanted it to.
Whilst this is an important task – it has to be right – this approach is clearly time-consuming, takes loads of effort and was, to me, annoyingly fiddly.
I was always missing things.
This wasn’t a great use of my time. Laborious, to say the least.
Nobody wants to spend hours doing hundreds of revisions and then having to check everything is correct.
There’s a better way to upload your content
Here’s the approach my team and I now use with all the clients we work with, it helped us to be more productive and more efficient as we saved loads of time – time originally wasted on editing our articles within WordPress.
Yipeee! I hear you!
We also found that many of the copywriters and content managers we spoke to also found this approach better, as it meant they now had a more efficient writing system in place.
It’s a win-win for all involved!
Time wasted means effort lost
For one article, you may spend a certain number of hours writing the piece, plus more hours editing it, and then even more to perfect it from word to web.
All adds up. And time is money.
This editing time takes valuable effort – some of which could be spent working on other priorities.
Your most valuable resource is your human resource, so don’t waste it on trivial things.
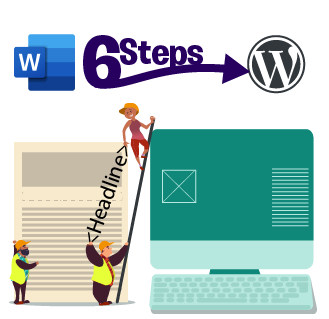
How to get your content from Word to WordPress
Here is a step-by-step guide on how to get your content from Word to WordPress.
This will save you mistakes and save that precious time which is being consumed unnecessarily.
Follow the advice here, and you’ll see a marked improvement on the ease and speed of your content delivery process.
Word and WordPress – what’s in it?
Word is a tool for writing and editing – used by millions of people every day.
WordPress was initially begun as a tool for writing blog content but has developed so rapidly and efficiently over the years that it is now the most popular content management system (CMS) in the world.
Although both Word and WordPress programmes are aimed at content, they are also quite different in their application and capacity and are therefore used in different ways.
I find it more efficient to prepare content in Word – it’s easier for our content teams to share, review and edit without any distractions about what it is going to look like once uploaded.
The trouble with using Word is that it doesn’t translate to web naturally, so you end up having to do a lot of text format corrections in HTML format when you do want to make this transition.
Translating content from word to web
Your content needs to be understood by the web, HTML is the standard mark-up language used by webpages to translate your copy.
Here are some basic points for those who might not know much about html copy structure:
HTML uses these tags < > as the start and end with the content in between.
The format for publishing web content is different than Word, so there are particular stylings you need to understand and use in order to get your copy correctly to its destination.
The basics of HTML formatting
Below are the key stylings you’ll need to know to pass your copy over to web.
-
- Paragraph – < p >
- Bold – < strong >
- Line break – < br >
- Italics – < em >
- Headers – < h1 > , < h2 > , < h3 > , < h4 >
- Links – < a >
- Numbered lists – < ol >
- Bullet points – < ul >

6 steps to get your content web ready
Follow these six simple steps and you’ll find that your flow for copywriting to web styling and uploading will go far smoother than ever before. You’ll find you save time, human resources and money, as a consequence.
STEP 1. Writing for the web
It’s really important to think about how your content is going to be read when you’re creating it.
Will it be read on multiple devices?
We are becoming increasingly mobile content dependant, something that’s crucial to bear in mind when you’re writing for web. Significantly, over the last decade, our mobile usage has reportedly increased over 50% for organic searches alone.
Writing for people who skim through content
In today’s hectic world where everyone has limited time, we like to scan and skim our way through content.
Readers will easily drop off site if they feel content is difficult to read, so we need content to jump out and speak to us.
In fact 79% of web users scan rather than read , especially if they are using mobile devices.
Articles that are text heavy without frequent paragraph spacing are hard to read and push users to search elsewhere.
Paragraph lengths matter
One way of keeping the eye on the page as well as ensuring the copy will sit well on all devices is by keeping paragraphs short.
Around two or three lines is the length you should be aiming for – which might seem odd to a writer – but for web it’s the easiest way for the eye to run down the page and stay interested.
Copy that is separated into paragraphs on a desktop won’t look the same as copy on a phone or iPad, so you need to make sure your copy is optimised for all readers, not just the computer you are using. Check and check again.
Making your copy stand out by breaking text into smaller chunks
As well as altering paragraph lengths, you can break the content down into structured, bite-size chunks of information.
Short paragraphs are a lot easier for people to digest and encourage the eye to read on.
SEO searches now look for topical content styling as well as key words, which means that the easier your content is to detect and understand (using clear titles and segmented content) the higher your rankings are likely to be.
Google will then know where to put you. Impressive, right?
It’s absolutely fine to write a single sentence and then move on to the next paragraph.
Does this suit all content types?
All content benefits from drawing in the eye of the reader, but in particular, content that is lengthy, such as articles and blogs – needs to be broken up to make sure the user continues to read.
Remember, over 4 million blogs are published every day . Putting in the effort to write a regular and engaging blog will do your business favours. Take the time to create great content and style it properly and you’ll see your search results lift.
You are competing in a very crowded market.
You need to make sure your content is more enticing and easier to read than your competitors.
Those businesses who utilise their blogs in the right way have seen a huge rise in leads compared to those that don’t.
That’s why your content needs to be well written, but also have the right layout and indicators for SEO to find and place you correctly.
STEP 2 – Headers and sub-headers
Headers are also beneficial for SEO as they tell readers and search engines what the text is about.
Headers / sub-headers in online content are important. They should break up the content in an easy-to-read way, and quickly engage and interest the reader with an accurate idea of what the subject is.
Just as segmenting your content into logical sections helps both reader and SEO, headers do the same, they identify the topics and chapters of your content.
Headers and tags are the SEO’s specific mapping to find you within the vast array of content on the internet. They are a big factor in your online identity.
This is a ranking factor when calculating where your content sits compared to the other articles on the subject.
That’s why it’s crucial to get your content and identifying headers, tags and links as accurate as you can – so you’re not getting put in the wrong area and are found by the readers and potential buyers you want.
Headers break up content
Considering most readers only read about 60% of content before bouncing off a page , it is important that your use headers to keep their attention focused.
Headers act as breaks within your content, they also let the reader pause, review and be kept aligned with the direction and flow of the content.
Headers make things clearer and easier to read.
Dividing your content up with these little gems makes it much simpler for a search engine to understand or ‘read’ and therefore place your text in the appropriate place.
Subtlety using keywords within all your titles is also helpful from a SEO perspective.
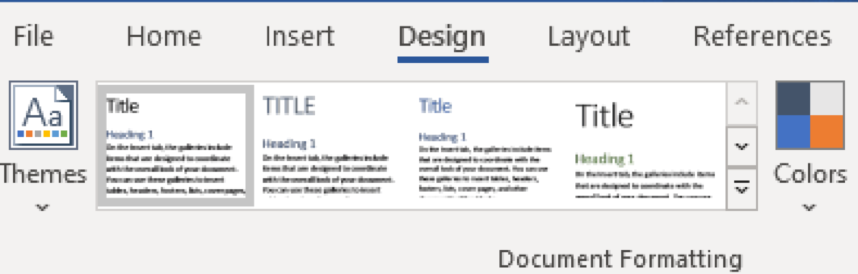
Setting up your H1, H2 and H3 headers in Word
H1 are the page headers and are used to start a page.
The H1s are also occasionally used within the text if you are talking about different subject areas which might be relevant.
For this article, we haven’t used an H1 apart from in the main title, as all the content falls under one subject area.
H2 / H3 tags are crucial for formatting content in the right way and can determine how well your content performs online.
These are the key types of headers you should use.
H4 is for smaller titles, such as within a list type section which we are demonstrating now:
Adding titles to a word document
You can find these headers in the top section of Word, under Design.
Simply highlight your chosen heading, right click your styles button and select your header, as below:
highlighting headers in html
You can also select headings by strong>clicking on titles at the top navigation ribbon of the design section within word:
STEP 3. Adding links to your document
Always add links into your content, this helps build better content for the reader and is another SEO ranking factor.
Links, along with content remain one of the most important external signals for Google’s search rankings.
Links provides credibility and authority to your content as you are backing up what your opinion with references to other information.
Hyperlinking or ‘anchoring’ your text to another website or document is simple enough – you just need to highlight your chosen word or title, right click on to link and copy and paste the link into the search bar, like so:
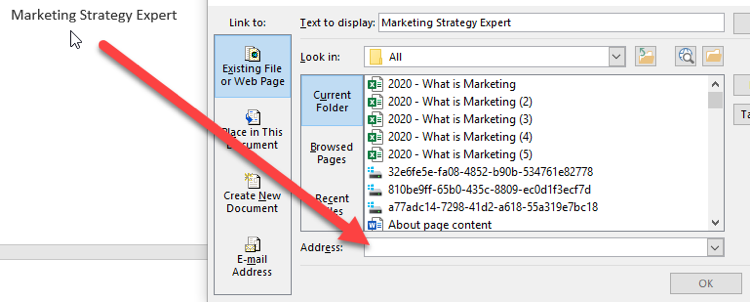
Bear in mind that your hyperlink will influence your SEO search.
Backlinks are where other online users mention you in their content and hyperlink back to your site. These can be beneficial and will almost certainly influence your SEO position, however, be mindful that without great content, the sites you want to be linked to won’t pick you up.
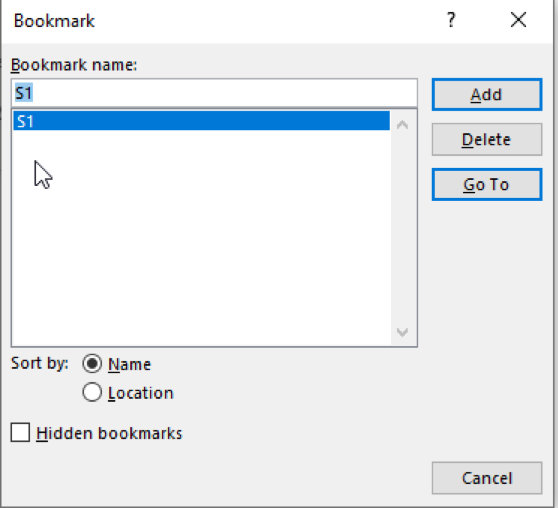
Tagging a link in your own document is a little different form titles, here is how to do it.
1. To tag a link within your own document, you’ll need to select the bookmark within Insert

2. Type a title for your hyperlink to find the content. I’ve chosen to link back to Step 1 (S1)
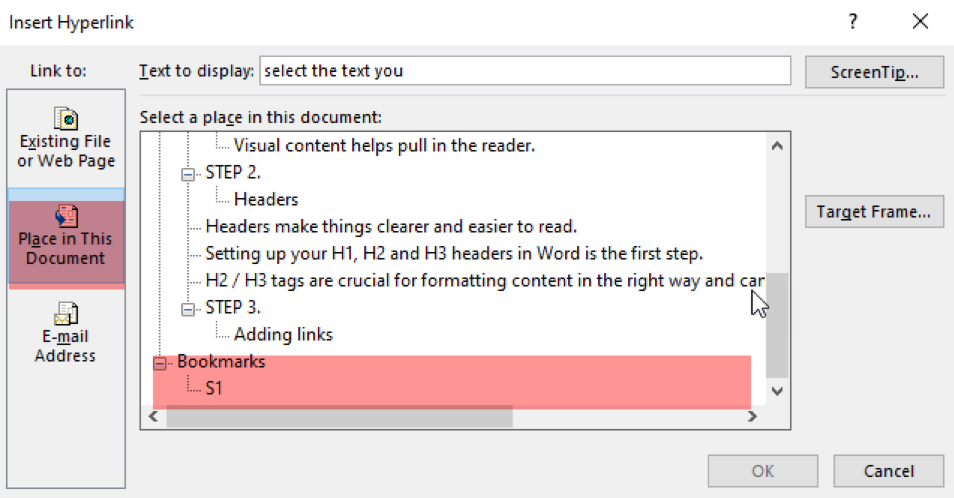
3. Add then select the text you want to create the hyperlink for, right click and select hyperlink and click OK – that’s it!
Step 4 - Bold, italics, underline and paragraphing
Using different styling techniques will help your content remain engaging and pull the reader back in when they begin to drift.
Stylings also allow people to skim easily if they need to, that is why we use so much bold within these articles – it helps the eye move fluidly.
Using italics emphasises your point and helps to draw us into the text again. All your stylings can be auto-transferred directly for web when you use the conversion tool below – HTML.
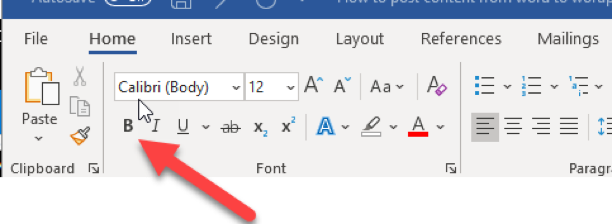
Using bold will also attract the reader’s attention and emphasises your points. Bold is at the top of your word ribbon on the left.
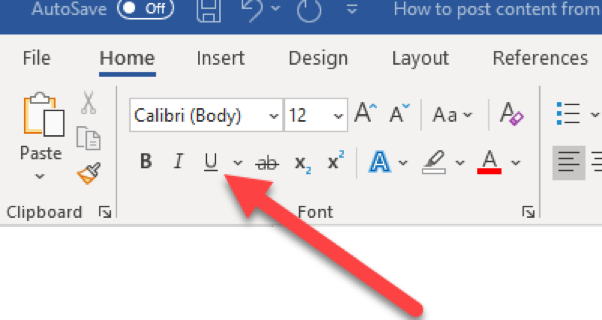
There are multiple ways to emphasise points and using the underline button is another way to separate and define.
Again, this tool is in the top left of the word ribbon, as below.
There are multiple ways to emphasise points and using the underline button is another way to separate and define.
Again, this tool is in the top left of the word ribbon, as below.
Step 5. Converting your Word document into HTML
Once you’re happy with your content and styling you can now convert it across the HTML.
There are a few options:
https://wordhtml.com/
https://wordtohtml.net/
https://word2cleanhtml.com/ – I found this one to be the best for us.
Please note, you need to check your content after putting though this process – We have found that sometimes these converters can miss things. Always check the text as a draft before putting anything live.
Some conversions are not great with certain lists you may have within your content, so make sure you check these too.
Step 6. Check and check again.
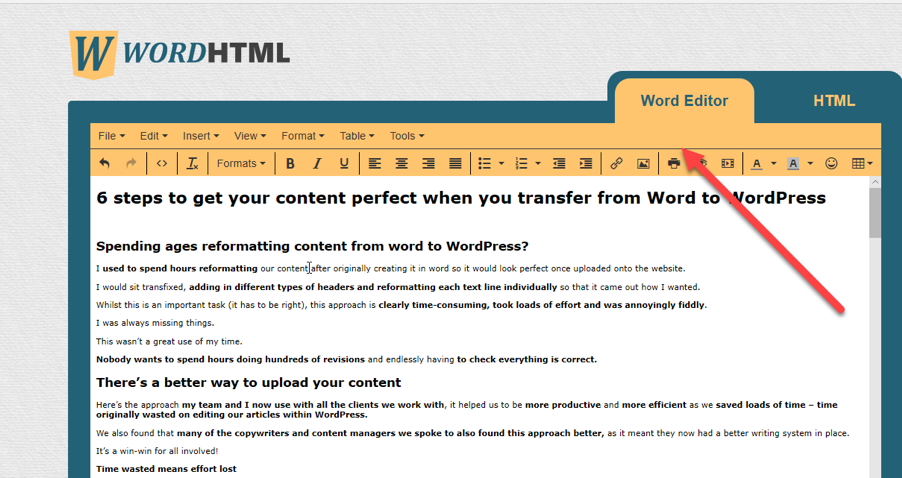
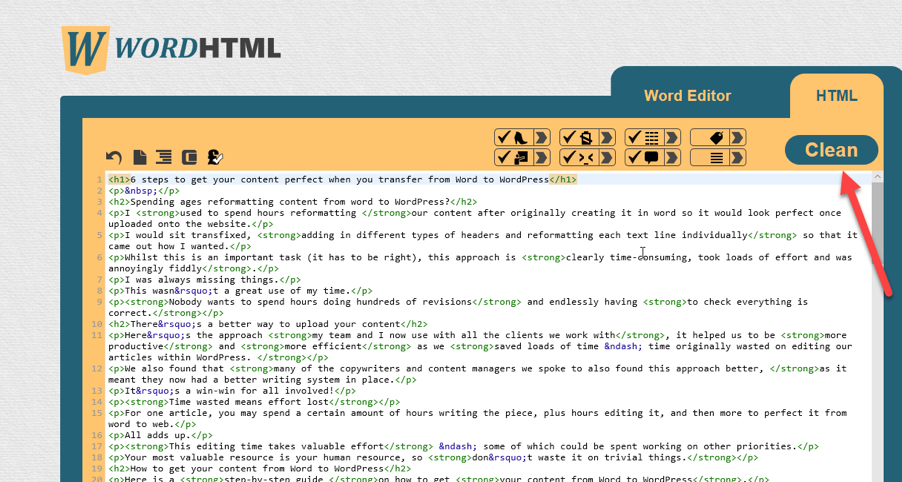
You can see a simple example below on converting your Word copy into HTML, using the HTML coding we talked about earlier. This is what your text should look like.
Here is an example using this article:
Finally, upload to WordPress
Upload to WordPress using the text area within your blog post using copy and paste.
Then save as a draft so you can check all the content has transferred across correctly.
I would recommend you get a couple of people to make sure this has been done, just so you don’t miss anything.
If you do find issues, either try the process again or use another converter until you get one which works perfectly for you.
You can also do lists in a different converter to the main one you use for your text if that works better for you.
Better system – better writing
Learn these basics for creating great web content and you’ll save yourself huge amounts of time and energy.
Stick to this process and you will quickly see how much more efficient your content posting process becomes.
Naturally, you will develop this process over time, so keep adjusting your methods until it is perfect for you.
Think we have missed anything or want us to cover an area of writing which is useful to you?
Add a question or comments in the comment section below.